Even a small burr on a TPR wheel can mark a painted surface or disturb rolling.
Most tread burrs form when TPR escapes through a gap or mismatch at the mould parting line. Buyers should locate the defect, check tread flatness, compare samples across cavities and shots, and confirm that rework will not damage the tread.
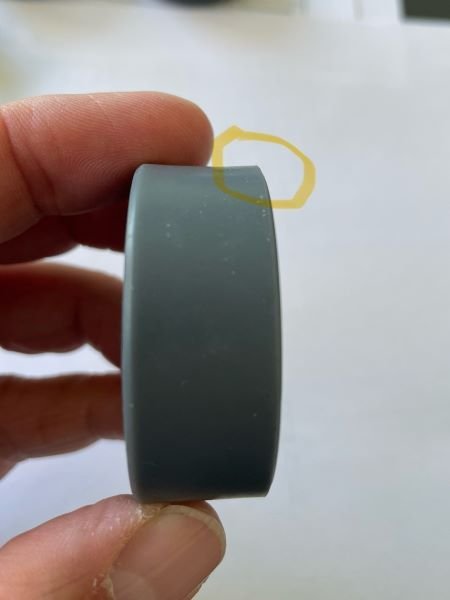
The highlighted area shows a raised or non-flat tread-edge region on a TPR wheel.
A customer contacted us after wheels used on rails for painted wooden window frames showed a sharp edge and raised tread area. The customer separated this from a rounded edge that was acceptable and pointed to the tread as the marking risk. We reviewed the marked samples and the moulding-line location. That distinction matters because a bore or rim burr may affect assembly, while a tread burr can contact the finished surface.
Why does flash form at a wheel’s mould parting line?
When two mould halves do not close evenly, molten TPR can enter the gap and solidify as a thin ridge.
That ridge is called flash. On a wheel, it may appear where the parting line crosses the tread, bore, or rim. Wear, mismatch, contamination, clamping problems, or an unsuitable shut-off can increase the gap. In this case, the correspondence connected the burr pattern with mismatch or gaps in a long-used mould. So it is necessary to inspect the tool condition and the defect location together.
The moulding line itself is not automatically a defect. A controlled line in the intended location can be acceptable. A sharp, raised, or non-flat ridge on the tread is different because it changes the surface that contacts the application.
Which wheel surfaces need zero-burr control?
The required control depends on where the excess material sits and what that surface does in the finished castor.
- Tread contact surface: A raised edge can mark a finished surface or change rolling contact. Rotate the wheel under good light. Check flatness, edge shape, and any sharp or raised material.
- Bore: Flash can interfere with the axle, bearing, or plain-bearing rotation. Use the agreed go/no-go method and check free rotation after assembly.
- Plastic rim or core: Excess material can affect seating, concentricity, or assembly clearance. Compare the rim with the drawing and inspect the full circumference.
- Parting line: A recurring ridge can show a tooling or shut-off condition that needs correction. Record its location, height or acceptance limit, and repeatability across samples.
For a castor buyer, the wheel check should sit beside the housing, axle, and bearing checks. A wheel can look acceptable from the side while still carrying a defect on the working tread.
How can buyers tell a burr from a flow mark?
Both defects can appear as lines or colour changes, but only one is necessarily raised.
A burr or flash is excess material. It normally feels or looks raised, sharp, or uneven at a mould interface. A flow mark is a visible change in the moulded surface caused by how the material flows and cools. It may be unattractive without changing the profile.
Early samples in this case showed flow marks after a new mould was introduced. Techin attributed that appearance issue to insufficient mould temperature. Technical guidance from Autodesk Moldflow on flow-mark problems also identifies melt or mould temperature as a factor in flow-mark formation.[1]
Use separate acceptance questions:
- Is the feature raised, sharp, or detachable? Treat it as possible flash and inspect the mould interface.
- Is the feature only a surface pattern? Check appearance requirements and confirm that the tread profile remains unchanged.
- Does the feature repeat in one cavity or appear across several shots? Mark the samples and look for a process or tooling pattern.
Do not use a photograph alone to decide whether a defect has a measurable height. Use touch, magnification, a suitable gauge, and the drawing or agreed acceptance limit.
When is reworking a TPR wheel burr unsafe?
Reworking is risky when the burr lies on the tread or when removing it can change the wheel profile.
Cutting, scraping, or grinding may remove the visible ridge but create a flat spot, a rough patch, a smaller diameter, or another sharp edge. That risk was central to the customer feedback in this case. A tread that must protect a painted surface should not be judged only by whether the burr is no longer visible.
Use this decision path before approving rework:
- Isolate one representative wheel and record the original defect location.
- Rework one sample using the proposed method, not an informal hand finish.
- Recheck tread flatness, edge geometry, diameter, and surface condition.
- Assemble the wheel in the intended axle or castor and check free rolling.
- Repeat the marking or contact-surface check required by the application.
- If the profile changes or the burr returns, correct the mould interface instead of extending manual rework.
The acceptance record should identify who approved the method and which measurements define a pass. This turns rework from a visual opinion into a controlled engineering decision.
What should buyers check before release?
Before releasing a TPR wheel sample, record the critical surface, defect limit, sample source, measurement method, and decision owner.
For multi-cavity tooling, mark each sample by cavity and cover multiple complete shots. A Schaeffler supplier/PPA procedure provides one documented example of cavity-marked samples, inspection records, and explicit approval decisions.[2] The exact sample count should match the buyer’s risk and quality plan.
Use a release record with these fields:
- Drawing number, wheel material, colour, and revision.
- Tread, bore, rim, and parting-line acceptance criteria.
- Cavity number and shot or moulding condition for each sample.
- Diameter and width readings taken with identified equipment.
- Hardness location and method if hardness is also a release criterion. ASTM D2240 covers indentation hardness for rubber and thermoplastic elastomers and explains why test conditions matter.[4]
- Rework method, before-and-after profile checks, and the person who approved the method.
- Final decision: approved, conditional, or rejected, with the reason recorded.
If the drawing does not define a suitable dimensional tolerance, agree the applicable requirement before sampling. ISO 3302-1 provides a standards-based reference for dimensional tolerances in moulded rubber products, but it does not replace the buyer’s product drawing or application requirement.[3]
Conclusion
TPR wheel tread burrs usually point to flash at a critical mould interface. Map the defect, inspect the tread, sample every cavity, and approve rework only after profile checks.
Useful Resources
- Autodesk Moldflow, Flow-mark problems
- Schaeffler, Supplier PPAP/PPA brochure
- ISO 3302-1, Rubber products, dimensional tolerances
- ASTM D2240, Rubber property, durometer hardness
References
- Autodesk Moldflow, Flow-mark problems.
- Schaeffler, Supplier PPAP/PPA brochure.
- ISO, ISO 3302-1, Rubber products, dimensional tolerances.
- ASTM International, ASTM D2240, Rubber property, durometer hardness.