Skip to content
A noisy castor swivel head can point to a race, assembly, wheel, or mounting issue. Buyers need a controlled sequence before rejecting a sample or approving a batch.
Classify when the sound appears, confirm whether it comes from the swivel head, wheel, axle, mounting, load, or floor, then inspect the ball races, compare swivel play and resistance, and record test conditions before final castor sample approval for release.
Move from symptom to source, then to approval evidence.
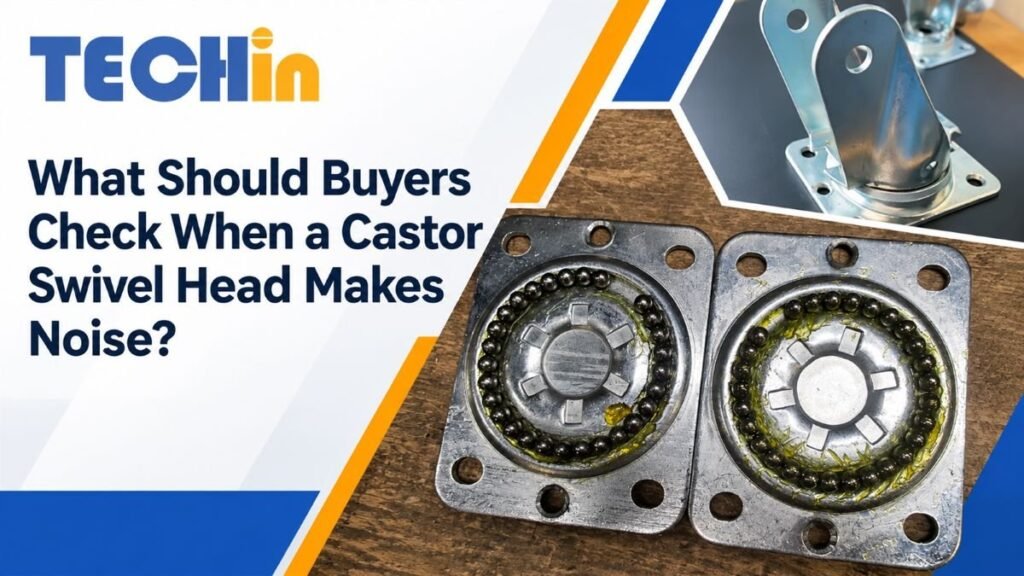
A customer contacted us after a heavy-duty swivel housing raised movement concerns. The customer stated that photos showed two missing balls in both upper and lower races, plus badly or unevenly punched races. We reviewed the comparison. The lesson is to connect a race finding with a finished-castor check and repeatable acceptance record.

What Can Noise in a Castor Swivel Head Indicate?
A sound is an early warning, not an interface diagnosis.
Classify noise by type, timing, direction, load, and repetition before opening the swivel head.
A click once per turn may point to a local race mark, ball, burr, or assembly contact. Grinding calls for checks of rough contact, contamination, lubrication, or running surfaces. A load-dependent rattle may indicate clearance. These clues choose the next check, not the final cause.
Record these observations before selecting a repair or specification change:
- type: click, grind, rattle, or roughness;
- timing: once per turn, continuous, or position-specific;
- condition: hand rotation, load, direction, or floor;
- change: wheel rotation or load effect.
Use the same reference castor and test condition. Record what changed, including wheel rotation or floor contact, not only “the swivel is noisy”. This makes source isolation possible.
Once the sound pattern is recorded, the next question is whether the swivel head is actually the source.
How Can Buyers Confirm Whether the Noise Comes from the Swivel Head?
Wheel, axle, fixing, frame, floor, and load can all transmit movement or sound into the castor housing.
Hold the wheel and axle steady, then repeat the test with the wheel, mounting, load, and floor variables checked separately.
The swivel head, also called the swivel bearing in European terminology, is the rotating assembly between the mounting structure and fork.[2] ISO 22878 separates wheel-play and swivel-play testing.[1] Apply the same principle in receiving checks: isolate one interface and record one condition at a time.
Use this isolation order:
- Wheel and axle: roughness, side movement, tread, and fork contact.
- Mounting: plate, holes, fasteners, and mating frame.
- Load and floor: repeat under intended conditions.
- Swivel head: record point, direction, condition, and result.
Keep orientation, speed, direction, and route consistent. A distorted mounting surface can load the swivel head unevenly, so repeat under intended load and working floor where relevant. Do not combine swivel and wheel play. Extra grease may change the symptom without identifying its source.
Only after this separation should a buyer open the assembly or request a race-level inspection.
What Should Buyers Inspect Inside the Swivel Head and Ball Races?
An opened swivel head can show valuable evidence, but disassembly can damage the assembly and should be controlled.
Inspect each upper and lower ball race for ball count, spacing, race continuity, deformation, burrs, grease, and correct seating.
The report records the customer’s statement that photos showed two missing balls in both races and badly or unevenly punched races. Use these findings to set inspection priorities:
- ball count and spacing;
- race continuity, forming, burrs, and edges;
- grease, debris, seating, and contact marks;
- assembly gap and reassembly condition.
Record race identity, orientation, opening time, and whether upper and lower races match. Check the groove, burrs, pressed metal, debris, lubrication, and gap. For double races, record each separately.[3]
After reassembly, confirm that balls, grease, seals, and plates are seated. Link the finding to finished swivel play, resistance, and repeatability. The photo supports the inspection record; it does not replace it.
This leads to the final buyer question: what evidence should a supplier provide before a castor sample is approved?
What Evidence Should Suppliers Provide Before Approving a Castor Sample?
A sample may sound acceptable during a quick hand check and change when its load, fixture, or assembly condition changes.
Before approval, require a repeatable record that identifies the sample, test condition, sound, swivel result, and acceptance decision.
The record should identify the castor or housing, approved configuration, drawing revision, fixture, load, surface, rotation direction, measurement point, and method.
For a noisy sample, record the sound pattern and separate swivel play and resistance from wheel play. Agree a reference castor, limits, and release evidence. Repeat first-piece checks after mould, riveting, ball-loading, or assembly changes.
Use this minimum release checklist:
- sample identity, configuration, drawing revision, and approved reference;
- load, fixture, floor, rotation direction, and test speed or method;
- sound description, swivel-play result, swivel-resistance result, and wheel or axle result;
- ball-race, ball-count, grease, seating, and visible-damage findings when opened;
- pass limit, inspector, date, and final release decision.
That record turns a subjective noise complaint into a controlled supplier and buyer decision.
With this record in place, the buyer can make an approval decision based on evidence rather than sound alone.
Conclusion
Classify the sound, isolate the interface, inspect the ball races, and require repeatable evidence before approving the castor sample or lot.
References
- International Organization for Standardization, ISO 22878:2004, Castors and wheels — Test methods and apparatus.
- AVO, Definitions and basic wheel components.
- Colson Castors, Swivel bearings and ball-race construction.